Pantograph
Pantograph
Overview
Construct a simple drawing machine that can copy, enlarge or shrink designs.
 Background
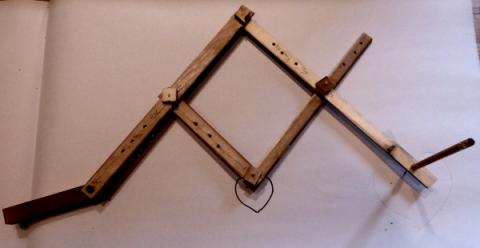
The pantograph consists of a set of sticks which are joined by rotating swivels forming a parallelogram. One end it anchored to a fixed point, a joint on the mid section has a tracing point, and a projecting arm has a mounting hole for a pen or pencil. When tracing tip is moved around the original the drawing arm amplifies the movement based on the size of the parallelogram. As the parallelogram is flexed it takes on a rhomboid shape. When the parallelogram is sized to be one half of the length of the end drawing arm the movements at the end of the drawing arm will be exactly doubled. When the parallelogram is made smaller and the drawing arm proportionately longer the movements are further amplified.
Materials
- ¾”x ¼” wood strips or dowels.
- Bamboo skewers or screws with nuts
- Pencil or pen
- Saw and drill
Directions
- Cut the following lenths
- 2) 320 mm
- 250 mm
- 160 mm th
- Drill 1/8” holes at intervals of 60, 15,25,50 and 150. Choose a drill that allows the skewer to rotate freely, or pick bolts and nuts that can rotate freely.
|
Hole |
Distance from left |
Enlargement factor |
|
A |
0 |
|
|
B |
60 |
5x |
|
C |
75 |
4x |
|
D |
100 |
3x |
|
E |
150 |
2x |
|
F |
300 |
|
- Drill one larger holed at point F on a long arm to serve as the pencil holder.
- Drill holes in short pieces of wood or slices of cork to fit tightly over the dowel.

- Assemble the pantograph so that all pieces pass through hole E.
- Press the pointy tip on the tracing hole on arm D.
- Attach the anchor point to a table with a screw or suction cup, or attached to another piece of wood which is taped to the table.

Directions for Use
- Tape the original under the tracing point when the pantograph is set for right angles and centered on the drawing.
- Tape the enlarging paper under the drawing arm. Test the position at the left,right, top and bottom of the tracing. It may be necessary to reposition the drawing after half is completed.
- If the pantograph is well balanced and the pen draws freely hold the pivot at the tracing tip and follow the outline and the drawing arm should leave a tracing. If the tracing is not bold enough you can hold the drawing arm while you watch the position of the tracing tip. Press down with the pen while you make the tracing tip follow the design.
- Try the other enlarging positions by using holes B, C or D as pivots.
- You can also flip the arrangement and place the drawing pen in the tracing hole and a tracing tip in the drawing hole. Now when you trace a drawing the pen shrinks the outline by the ratio of the holes.
Challenge
Can you find other examples of machines or tools that use parallelogram design?
Can you use a photo on your tablet or smart phone as the original and make a lifelike sketch?
.
Files: